Showing posts with label Going Green. Show all posts

Monday, August 29, 2011

The Project List


A few nights ago, I was laying on my back  in my very comfortable bed - fresh sheets are just so comforting.  The fan was ticking while cooler air circulated through the open window in our bedroom.  The moon trickled in its light into the crevices of the room.  I was staring at the ceiling watching the fan.   My mind swirling with thoughts.
I started to giggle - just a small giggle at one particular thought.
My hubby asks me, "What is it that makes you giggle?" 


"Well,  I can't help but laugh at myself.  Here I am in the midst of it again.   In the midst of a very long "To-Do" list....  I laugh because it is just so like me to have a big list...  I tend to just pile up so much on my plate at once.  You'd think I would learn, right?"

Well,  if you know me - or at least most of my close friends know - I "book" myself up with SO many things, activities, projects, this and that,  that I think I just overwhelm them with just the thought of my list and all that I do....

...trust me... I get overwhelmed over and over again.  I always ask myself  "Why? Why do I do this to myself?"

To be honest,  I think (as I reflect over my life) that I truly do better when I have MORE to do.  Sounds crazy  huh?  But, I am more effective (not perfect and nor do I always complete a project task) when I have a busy  schedule and list of things to do.  When I have less to do, I tend to be lazy - and sometimes I get into a bout of depression.

Now,  the important aspect of this "busy-ness" is to be able to find time to rest.  Taking breaks, taking time have a rest day...and not surround myself  with overload where I come crashing down.

So... that evening hubby and I went on to discuss this scenario --- that unlike other times - I was actually feeling a bit of peace.  I wasn't anxious or feeling stressed.   I was excited about the projects and my to-do list. -- however,  I admit that I was a little worried that I would forget something or someone important in the midst of the overwhelming list of tasks to be done.
I was just thankful to the Lord in the moment that I was able to encounter peace and be able to just giggle through the craziness of my life.   Thank you Jesus!

Well, some you may be itching to know my "Project List"?   Okay.  I will share with you.

Now,  keep in mind my to-do list also has everyday/weekly tasks such as Laundry, Cleaning, etc.  I am not going to list all those out, but they are definitely included in my maddness of things I am working on.  Also, I did not include on here activities such as Women's worship group rehearsals, Girls dance lessons, Bible Study groups,  grocery shopping, mailing packages, etc.  to the list.

My "Project List" 

Project # 1: Declutter/Organizing:

Sophia helping fold laundry!  Look at that happy smile!
She loves to be a helper! 
Lydia is dusting with the Webster!
This is probably the largest project I am working on because it includes small projects within it.
I am going through each room - purging, sorting, organizing.
I have 5 boxes labeled:

  • Put Away
  • Toss
  • Missions
  • Take Back
  • Keepsake
  • Find A Home - this is for things that need a home. 


As I go through the room, I put things into one of the appropriate baskets.  Our church is having a huge yardsale to raise money for Missions and we are contributing stuff to it.  So, things that go into the Missions box will go to that cause.   When the "Put Away" Basket is full, I simply go around putting it away.

I am also working on "Organizing"  using a lot of these methods from Danielle Darcy 

Project # 2:  Decorating the Girls Room
We chose 3 options for the wall color.  The girls decide on "A"

 Aside from decluttering & organizing,  I will be doing the following:
1. Painting 2 of the walls
2. Sanding and Painting  two dressers ( adding new hardware)
3. Putting Desks & shelves together for the "education/homework" area.
4. Getting School boxes, etc. together

Project # 3:  Canning

We were given a lot of tomatoes and also had some tomatoes from our own garden. So, I am going to be canning most of these.  Some of them I am using for the week, but some I will be making sun-dried tomatoes.  I am canning: whole & half fresh tomatoes, diced tomatoes, tomato sauce, salsa, and making pasta sauces.


So, as you can see - lots of things keeping me busy.   On top of school starting for us in about a week, I will traveling out of town soon too. Phew!

Please pray for me as I am working my way through the projects that I will be relying in the Lord's strength to get through each day and that I will be worshipping Him in all that I do.

Now....off ....to work.... I go....

Tuesday, October 12, 2010

Create With Me: Gift Bag (Tutorial)

This is a simple project that a beginning seamstress can make. I love bags - and my girls do too! They have caught on to my love for bags. I made this simple gift bag in about an hour (with all the interruptions from my daisies). This bag would be perfect to use as a gift bag - especially for Christmas coming up soon too.

I had a little fun with it and made a tutorial for you! If you make a bag - please share with us! I would love to see your creations!

GIFT BAG

1. Cut two pieces of your fabric and two pieces of the lining material all to the same size. Any size, any shape rectangle. A variety of sizes is useful, and square or "close to square" rectangles are the most versatile shapes. I cut out 10" x 14 " rectangles.


2. Put each fabric piece on top of each lining piece, fold over the top edges and sew. Just the top edges. Now you've hemmed the opening edge of the Gift Bag.


3. Attach 2 ribbons about 2 " from the top with a pin - onto one of the decorative fabric pieces (the front side). I used two different scrap ribbons that I had


4. Stack both sets of fabric with the lining (inside) faces to the outside. The decorative fabric pieces will be facing each other on the inside of the "sandwich". Tuck the ribbons into the middle of the sandwich. Be sure the hemmed edges are both on top. Sew the three un-hemmed edges with a simple running stitch, 1/4" in from the edge.


4. Turn inside out. That's all there is to it! The bags are ready to use, or ready to give as gifts themselves. Fill your bag with goodies and tie the ribbons together!


Simply Beautiful!

Wednesday, April 14, 2010

Spring Clean Carnival -- The Bathrooms! (Recipe Included)


I was glad to do the bathrooms this past week, because the last week was such a busy week and cleaning the kitchen was A LOT of work. It was nice to have a somewhat easier week with cleaning -- especially since I took on a big sorting clothes project this week!

The bathrooms were kind of fun to do -- I know that that sounds weird, huh? But, I think that I spent more time decorating and organizing than cleaning them. I like that part of it more. I have been in the process of moving rooms all around since February. We have done a major overhaul of switching rooms --and part of it was the bathrooms.

I don't have too many before pics because I had already been moving stuff from one bathroom to the other. The girls are now in the Master Bedroom and now claim the Master Bath as well. We took over the girls bath/ guest bath.

So, this week besides cleaning, I made it "our own" bathroom sanctuary! My guests like it too...because they don't feel like they have to go in a kid bathroom with toothpaste stuck all over the vanity!

This was my plan:

* Sinks
* Toilets

* Tubs
* Mirrors
* Under cupboards
* Drawers -- clean & organize
* Floors
* Wash Shower curtains and area rugs

I did NOT clean the bathtubs this week-- Ahem, I was a little bit clever and put my girls to work for me! The Lil Daisies cleaned it for me! Nice! I made a safe cleanser for them to use. And they LOVED it. I gave them a bowl of homemade soft scrub and each a sponge and they got in the tub and scrubbed away. It smelled so good in there! After rinsing they -- enjoyed a nice warm bath in the CLEAN tub!
I am telling you -- it is a great way to have your tub cleaned!!. Just a warning tip -- it is slippery, so I have them start at the top and then go down to the bottom of the tub -- that way they can be on their knees and not slip in the tub while cleaning.

HOMEMADE SOFT SCRUB CLEANER

1/2 Cup of Baking
Soda
Liquid Castile Soap
5 drops Lavender essential oil and/ or 5 drops Tea Tree essential oil

Simply pour about 1/2 cup of baking soda into a bowl, and add enough liquid detergent to make a texture like frosting. Scoop the mixture onto a sponge, and wash the surface. This is the perfect recipe for cleaning the bathtub because it rinses easily and doesn’t leave grit.

Note:
I used Dr. Bronner's Lavender Liquid Castile Soap -- therefore, did not need to add the essential oil. The Lavender smells so nice and clean! The essential oil is optional --but, if you have plain Liquid Castile soap -- I prefer to add it because the smell is just yummy!


OKAY OFF TO VIEW THE BATHROOMS~

BEFORE:

AFTER:

THE GIRLS BATHROOM:

I organized the girls hair pretties. So far it is working out great. I found containers that I already had and used them to separate each of the hair accessories: clips, hair-bands, head bands, larger foofy hairties....

The girls top drawer contains organized toothbrushing station.... the containers make it easier to maintain --that way the toothpaste and toothbrushes are not just thrown in the drawer and mixed around into a big mess.

The girls bottom drawer is organized with hair brushes (also a box to hold brushes -- to maintain organization), hair dryers, curling irons, etc.


Created Potty Books for Rosi in both bathrooms. She loves to read while going on her potty. This container keeps the book in one place rather than all over the back of the toilet or on the floor. It is her own Potty Library!

THE GROWN-UP BATHROOM

I bought myself a new floor rug -- it was time for a new fresh one! I also created a new picture frame over our toilet (I will have to share how I did this in another post)


Organized the drawers: going from a much larger bathroom space to a smaller space was a bit of a challenge -- but, it was a good time to purge old stuff, minimize toiletries, and find better solutions to organizing what I had. I now enjoy the simplicity of it all.

Thursday, April 08, 2010

OOPS! I forgot a title to this post!! --Join in with me?

I hope that some of my readers will join in and share with others about the Lil Daisies Spring Clean Carnival. I would love some company in my insane pursuit of a clean spring home! Please?

Plus, I would love for someone to win the fabulous prize at the end of the Carnival. Need a reminder of what you could win?

I think so.


* TWIST Bamboo Cloth - contains three 100% Biodegradable bamboo clothes. Dusts- Polishes, All household uses! Made from Bamboo and Corn.


* Microfiber cleaning towels - contains two sunny yellow clothes


* Mrs. Meyers Clean Day Surface Wipes (Lavender Scent)


* Mrs. Meyers Clean Day All Purpose Soap Bar (Lemon Verbena Scent)


* 12 Lil Daisies Homemade Cleaner Recipe cards


* Lil Daisies Homemade Luxurious Linen scented Sachet


* Lil Daisies Wild Flower Mix for planting


* Lil Daisies "Daisy" flower mix for planting


* Meal Planning Pad (magnet)

* Lil Daisies Homemade Cleaning Apron (not shown in pic)

Is that enough to motivate you to clean at least one room in your house?

Remember you do not have to participate in every room to be entered into the challenge. Even if you clean just one room -- that gives you one entry into the prize. AND, it just may make you feel a little better to have at least one clean room done in your house...but, of course if you clean more than one room ...you will have more entries into winning the fabulous prize!

You can join in anytime --- We are currently at WEEK TWO !

You can enter through Mr. Linky at the end of the weekly posts or leave a comment at the weekly posts as well. ---I hope you will join me!

Wednesday, April 07, 2010

Fabulous Tip -- Homemade Household Wipes


As I was reading through blogs ~ I came across THIS post on how to make your own household cleaning wipes! I LOVED this idea! Fabuloso (if that is a word?)

Moneyless Mommas, Tara & Jessica were so creative in coming up with a safe, economical way to make your own household wipes! I found it in particular perfect timing for me, because somehow we ended up with two huge packs of paper towels from Costco! So, I was able to put some of these rolls to good use!

And, then I stumbled across this site and found cleaning wipes too! So, there are several places to find cleaning wipes when you do a google search.

I was inspired to make my own and thus I adapted both cleaning wipe places and came up with this!

Cleaning Wipes


Materials Needed:

  • cylindrical or tall square plastic food storage container, 10-cup capacity. ( I found mine at Walmart - a two pack for 2.99)
  • extra-large roll of paper towels - I used 1 roll bounty paper towel cut in half (my hubby cuts them in the garage with his power miter saw)
  • cleaning agents of your choice (recipes follow)
  • electric drill with 1/2-inch drill bit
  • liquid measuring cups

Instructions:

In the garage or workshop area, place a small block of wood beneath the plastic food storage container lid. Use electric drill to drill a 1/2-inch diameter hole in the center of the container lid.

For best results, select an extra-large roll of good quality paper towels for this project. I used Bounty and that seemed to work very well. I am told that less-expensive towels fray or shred when pulled through the holder.

For cutting the roll in half using the electric knife:
Without removing the paper towel wrapper, use the electric knife to cut the paper towel roll into two shorter rolls. Save the second roll for a refill later. Be patient! It may take up to two minutes to cut through the towel roll and cardboard tube inside.
Otherwise -- bat your eyes and ask hubby to cut it in half for you using his power tool!


Remove the wrapper, and place one short paper towel roll inside plastic food storage container. Using a liquid measuring cup, gently pour one of the following cleaning solution recipes over the top of the paper towel roll.

You will need between 2 and 4 cups of cleaning solution, depending on the size and absorbency of the paper towel product selected. These recipes make about three cups of solution; increase or decrease amounts if needed.


Place the lid on the plastic food storage container, and allow paper towels to absorb cleaning solution for 4 hours to overnight.


Open the food storage container. Gently pull the wet cardboard tube from the center of the paper towel roll and discard. Carefully pull the end of the paper towels from the inside, where the cardboard roll had been. Thread the end of the towels through the hole in the lid, and replace the lid.Pull gently on the exposed end to separate the cleaning wipe.


RECIPES:

General Cleaning Surface Recipe:
  • 1 1/2 cups white vinegar
  • 1 1/2 cups water
  • optional: A few drops of favorite scented essential oil. I used lavender.
Disinfectant Cleaning Recipe:

  • 1/4 - 1/2 cup of pine cleaning solution such as Pine Sol
  • 2 1/2 - 2 3/4 cup of water


Window Glass Cleaning Recipe:

  • 1/2 cup of rubbing (isopropyl) alcohol
  • 2 1/2 cups water
  • 1 tablespoon white vinegar

Tuesday, April 06, 2010

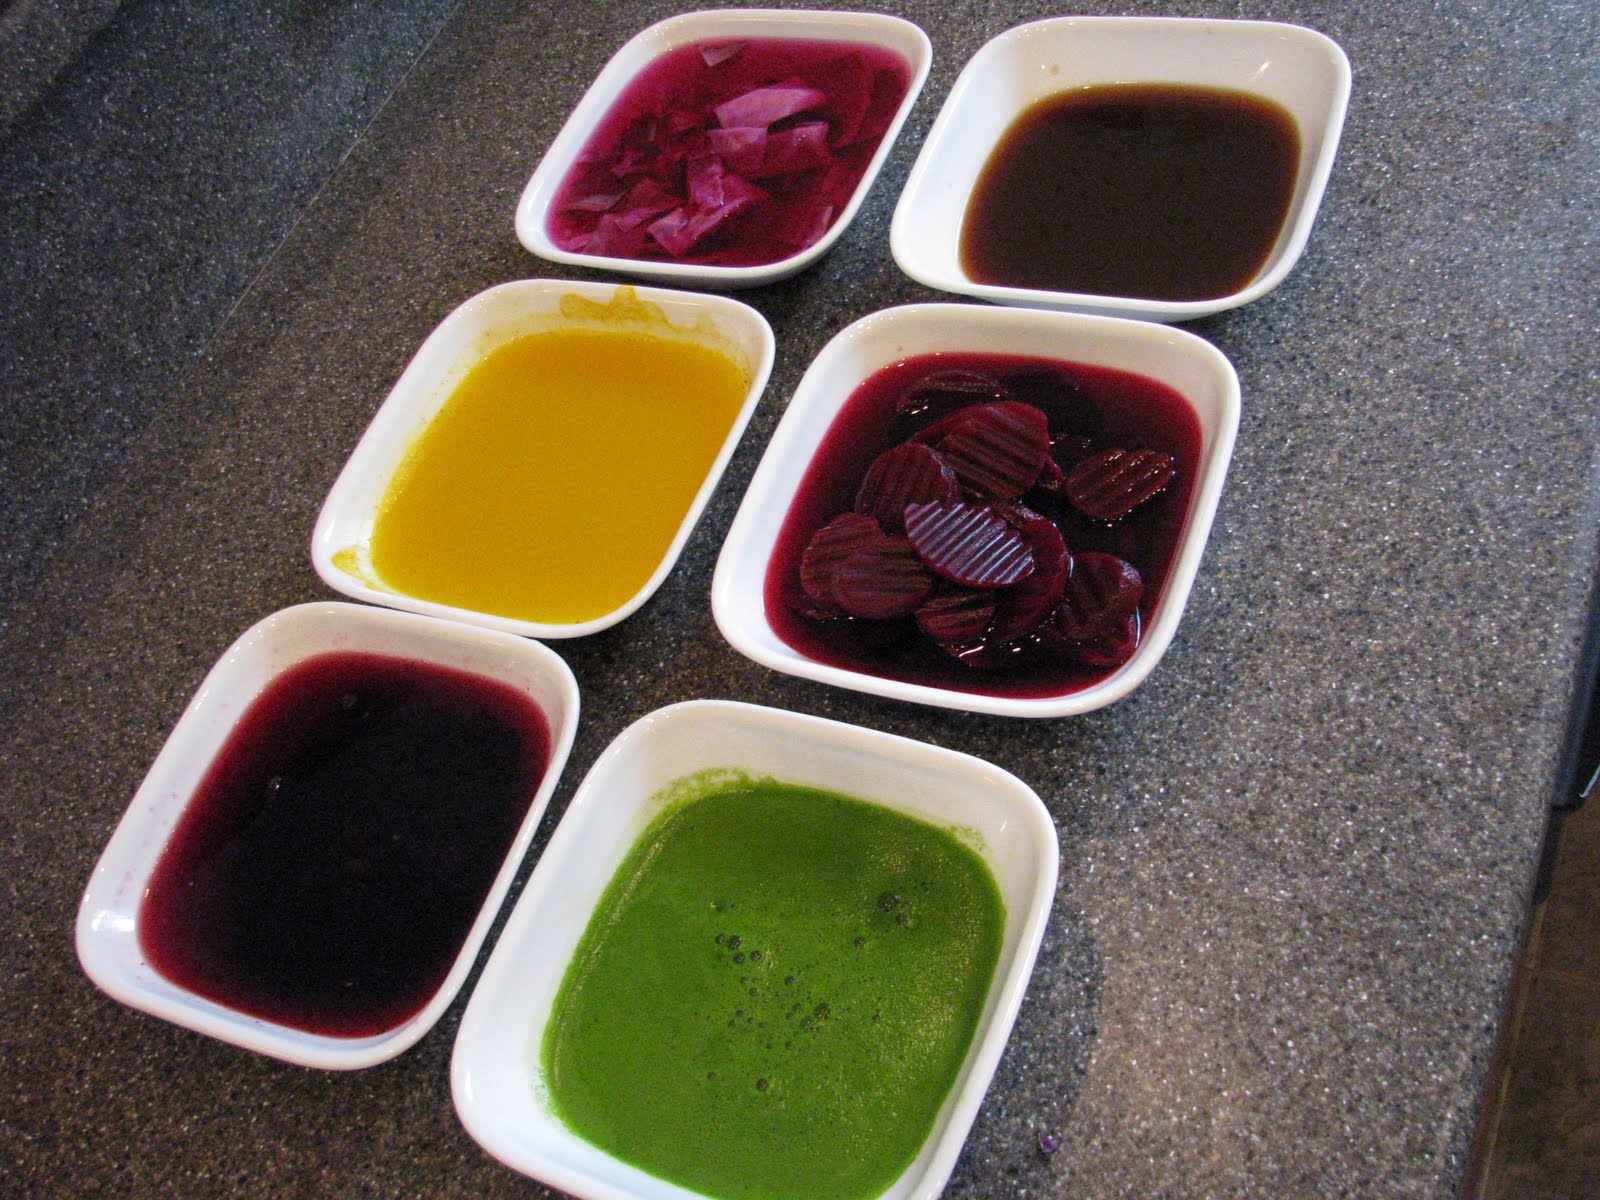
Natural Easter Egg Dyeing


This year I tried a Green twist on Easter egg dyeing. I googled Natural Easter Dye and came up with several sites that had recipes. So, I dove in and tried it. One thing that I realized when doing this -- is that it takes awhile for the dye to adhere to the egg. The longer you soak it, the better results you will get. I read that some suggested leaving overnight to soak.


As a mom....knowing the kids would rather see instant results to be able to be more creative with their egg dyeing...sometimes it is better to use the store tablets. However, the beet juice did work pretty well. I think if you were to make your dyes in advance and make them more potent, it might work out more beneficial for the impatient child!

To Make Natural Dyes for Easter Eggs:


What you will need:

Natural dyeing agents (red cabbage, turmeric, onion skins, beets, blueberries, orange peels, and coffee)
3-quart pot (or larger)
White vinegar

Strainer
Small bowls
Eggs
Large metal spoon
Paper towels
Drying rack


Green – spinach powder or parsely powder ( green was a difficult color to do for us -- I ended up blending fresh spinach and vinegar in our vitamix and then straining it...it worked fairly well)
Brown
1 cup strong coffee and 1 tablespoon vinegar

Blue/ Purple
Cut 1/4 head of red cabbage into chunks. Add cabbage to 4 cups boiling water. Stir in 2 tablespoons vinegar. Let cool to room temperature. Remove cabbage with a slotted spoon.

Bluish-Gray
Mix 1 cup frozen blueberries with 1 cup water. Bring to room temperature. Remove blueberries.

Dark Pink/ Red
Cut 1 medium beet into chunks. Add beet to 4 cups boiling water. Stir in 2 tablespoons vinegar. Let cool to room temperature. Remove beets.

Yellow
Remove the peel from 1 orange. Add peel to 4 cups boiling water. Stir in 2 tablespoons vinegar. Let cool to room temperature. Remove orange peel.

Orange
– curry powder/tumeric or onion skins
- for onion skins boil in water -- then add vinegar. Strain. Set egg in for at least 1/2 hour
- for tumeric powder - mix 4 Tablespoons with 4 cups boiling water and 2 Tablespoons vinegar.


Monday, March 29, 2010

SPRING CLEAN CARNIVAL -- Week 1


Are you ready? Do you have out your favorite cleaning supplies -mop, rags, broom, dusting wand? Don your favorite apron and let's dive in!

You can join anytime during these next 5 weeks! Just join in wherever we are at... If you want to read up on how we are going to do the Spring Clean Challenge go HERE!

I hope you will join me ~ I need the support and what better way than to get a little clean shine to your home by doing it together?

Note: Some of you asked if you could do ALL the cleaning this week? Why YES...if you are industrious and have the time to do it all, by all means GO for it! I broke it down into smaller steps by doing one or two rooms over the next few weeks. I can only do just a little bit at a time to maintain the rest of my household!

Just remember that you get ONE entry for EACH room that you clean in your home!So, be sure to leave one comment for each room completed. There is a fantastic prize in the end! If you have a blog, it would be fun to see the before and after pictures too.
I will be doing this!


THIS WEEK: THE KITCHEN
(I will post my pictures this week!) I am starting with the Kitchen mainly because it is one of the hardest rooms and I like to get it out of the way!

Here is my plan:

  • Wash the outside of cupboards, handles
  • Wipe down windowsill
  • Shine sink
  • clean off all counters
  • clean under the dish drain
  • microwave
  • clean out dishwasher drain plug
  • clean under kitchen sink cabinet
  • floors
  • outside of appliances (refigerator, oven, dishwasher)
  • oven - inside, and outside
  • wipe down small appliances (crockpot, vitamix, coffee maker, cuisinart food processor, etc.)

Remember your plan will be different from mine.vSpring cleaning is defined by you - we'll operate on the honor system. We all have different ideas about what spring cleaning means, so I'll leave this pretty open.

Okay, Let's go!

Related Posts with Thumbnails